Workflow Builder
The Workflow Builder is where you turn one-time posting work into a repeatable system. Instead of manually republishing every asset, you connect a trigger, shape the timing with delays or schedules, and finish with one or more actions.
What you can automate with the Workflow Builder
- Detect a new TikTok video and republish it to YouTube Shorts 30 minutes later.
- Detect a new Instagram post and share it to Instagram Story after a short delay.
- Detect a new YouTube Short and fan it out to TikTok, Instagram Reels, and Facebook Reels with staggered timing.
- Reuse evergreen content from your repost queue and drip it out at fixed times or best-time slots.
- Cross-post professional updates from LinkedIn to X with a custom caption format.
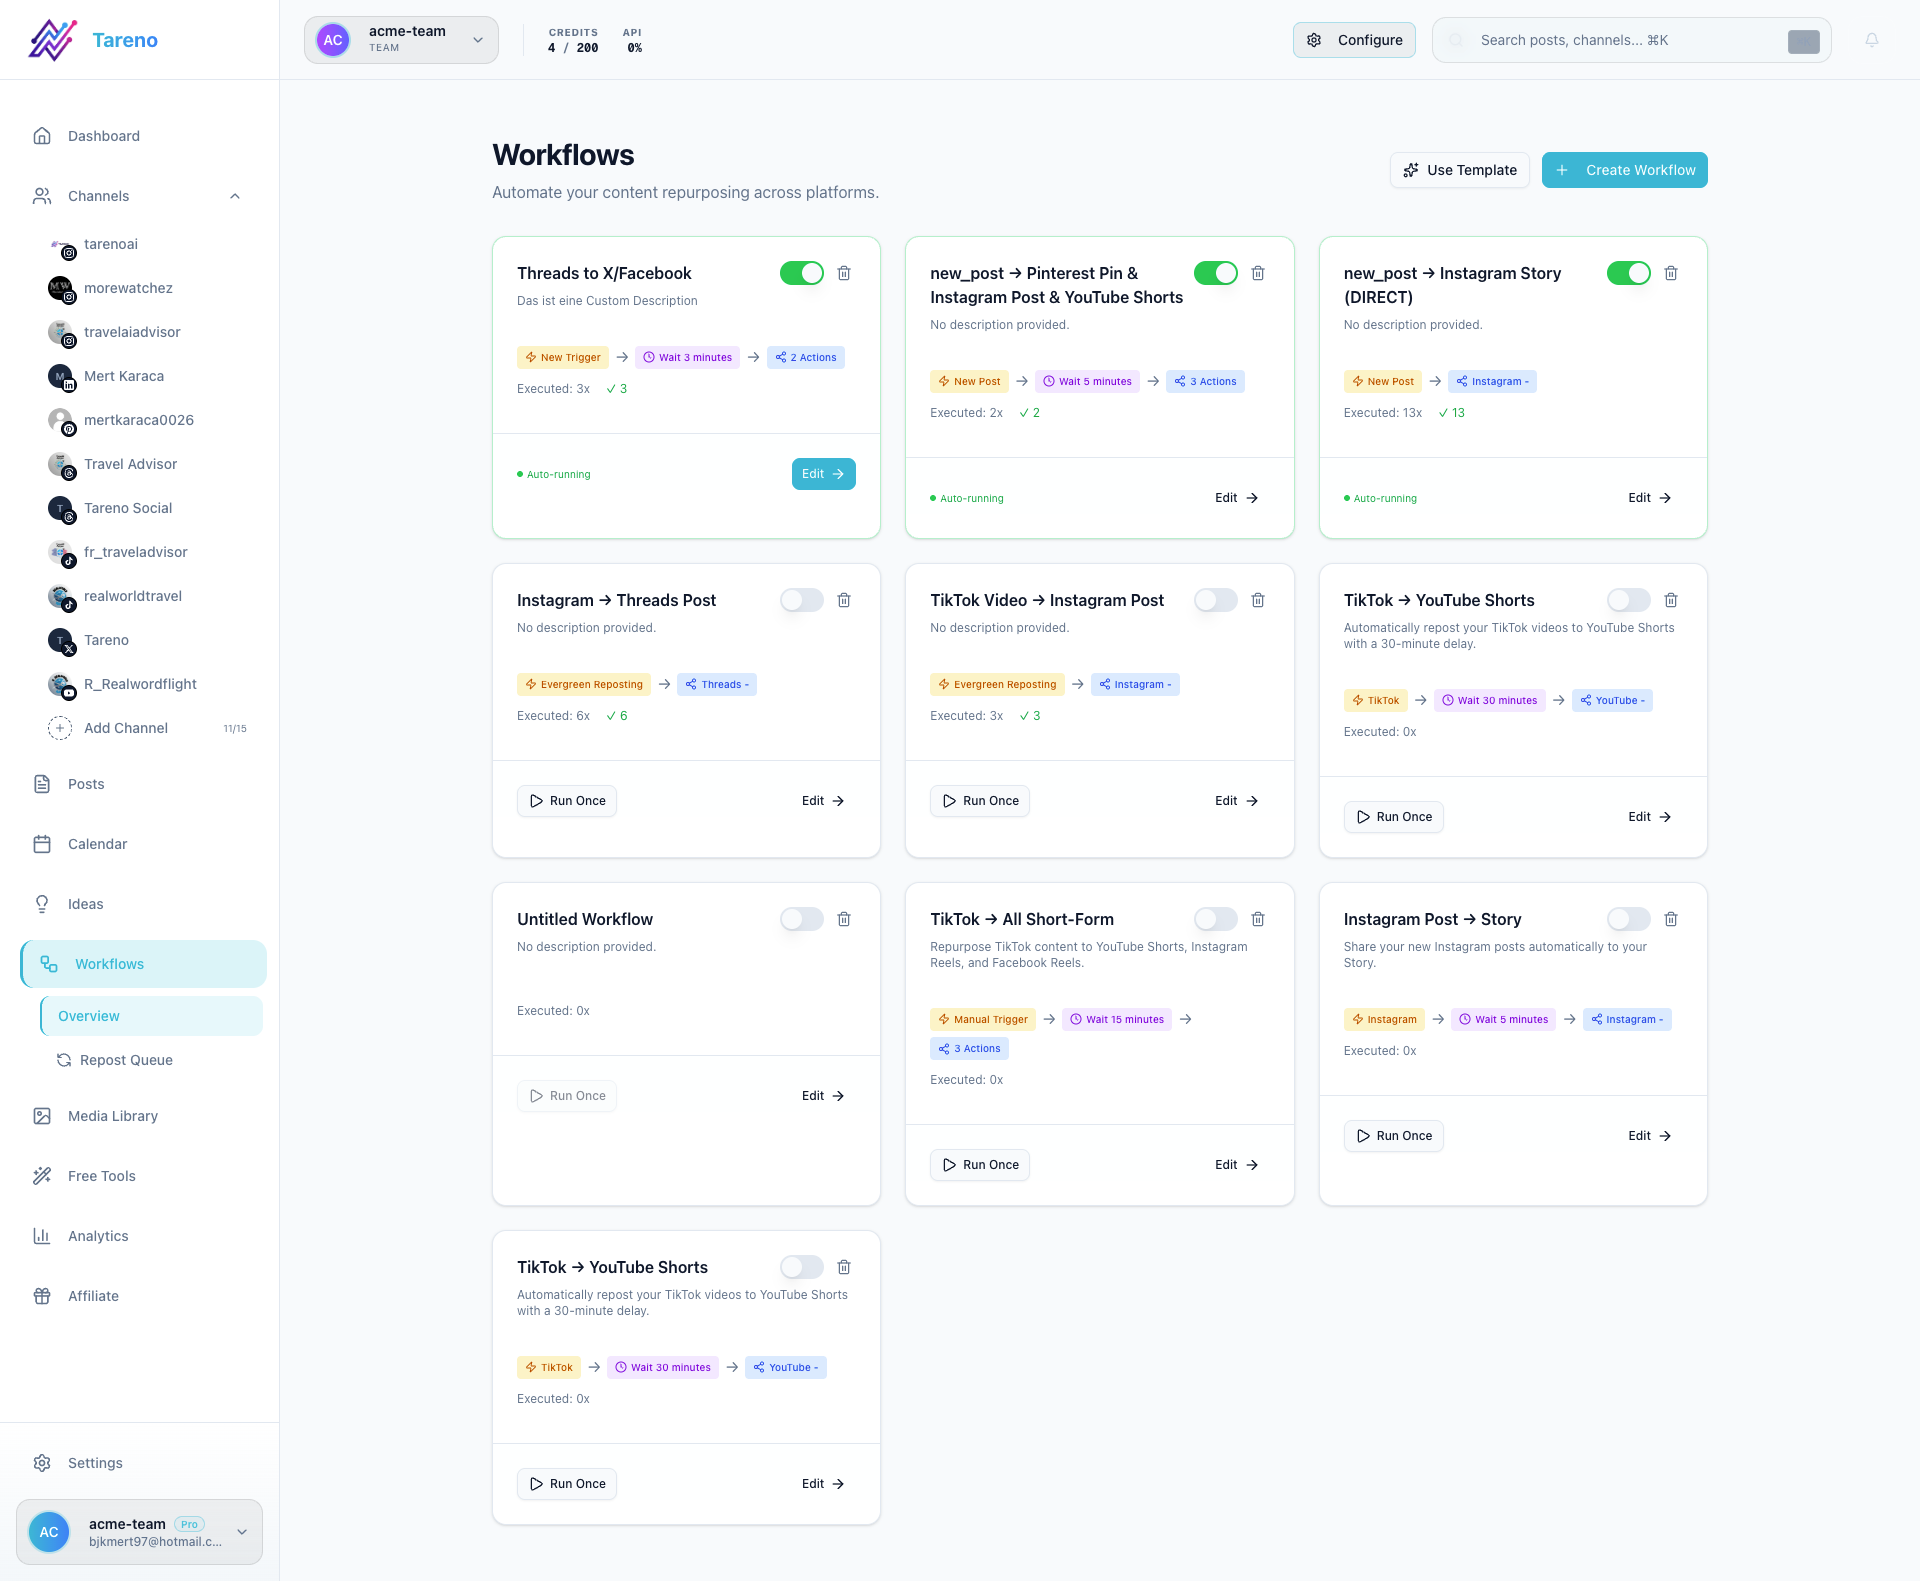
Start from the workflow overview
The workflow list shows all active, paused, and draft automations in one place. Use it to review existing workflows before you create a new one, especially if your team already has automations running for the same channels.
Build visually inside the editor
Open any workflow to build on the canvas. The editor lets you drag nodes onto the board, connect them with edges, and adjust each node from the settings panel on the right.
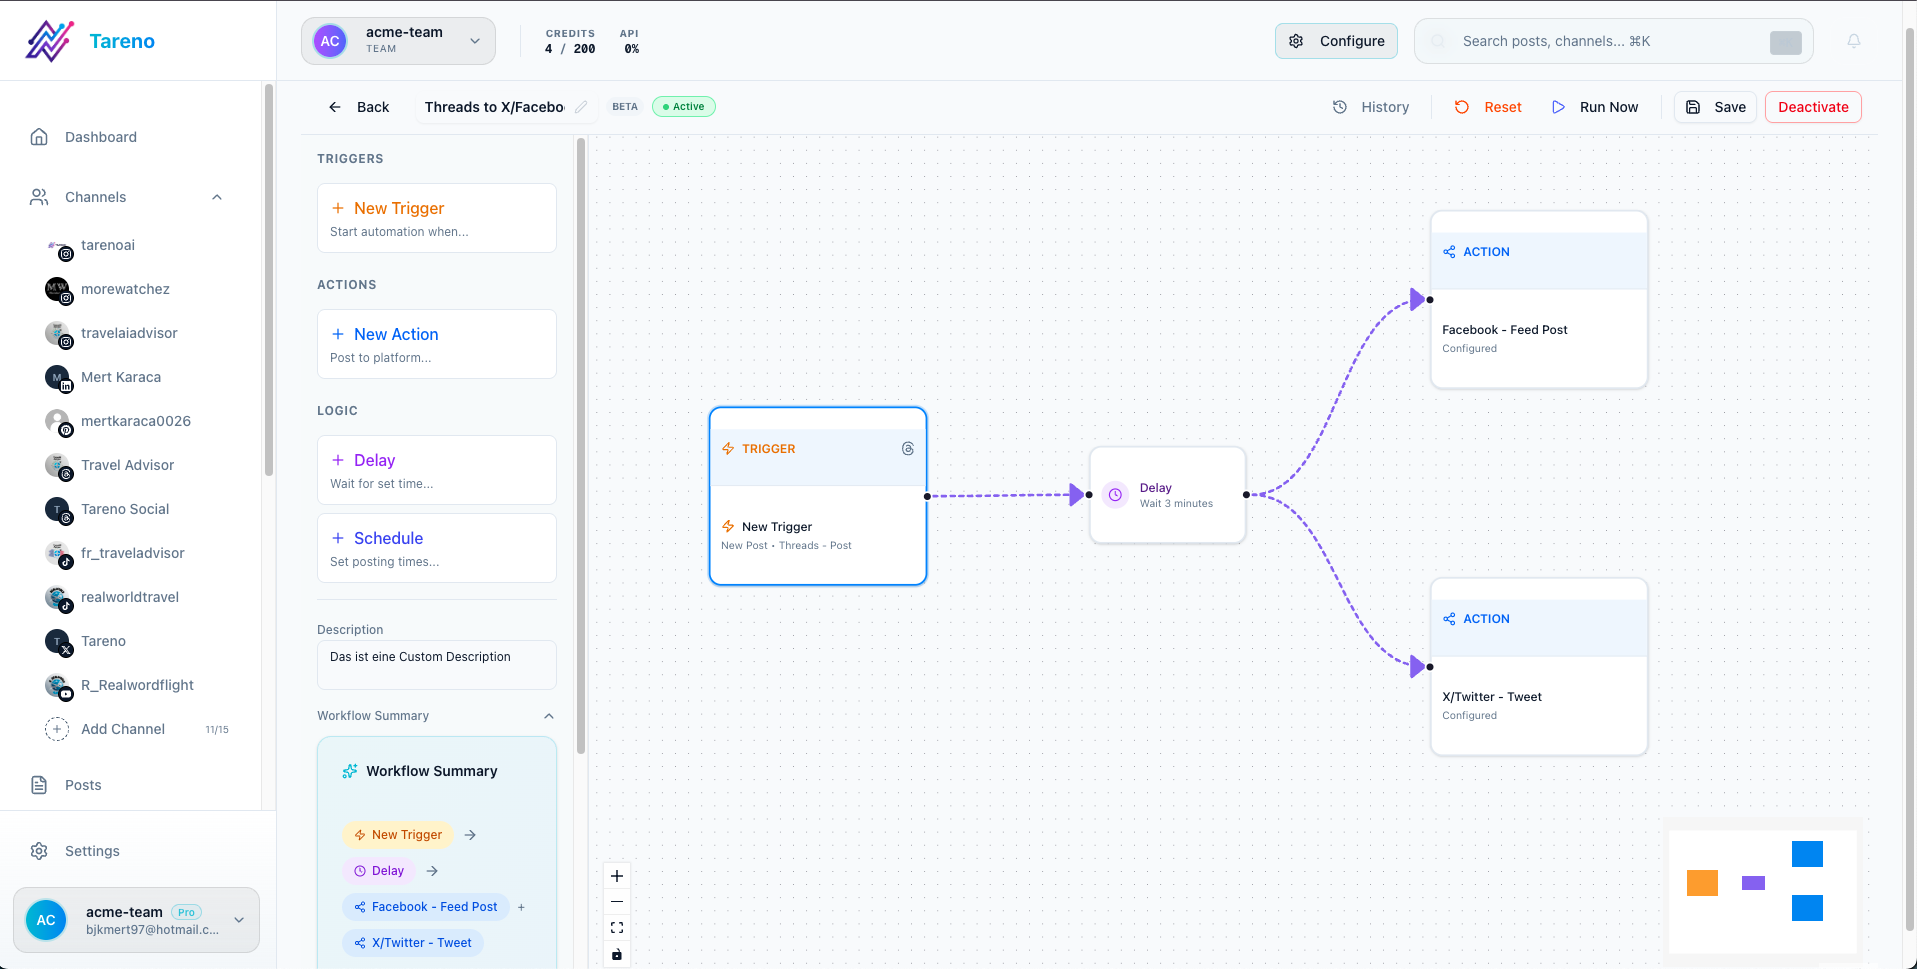
The normal build order is:
- Add a Trigger node first.
- Add a Delay node if the workflow should not run immediately.
- Add a Schedule node if content should be published in a controlled daily cadence instead of right after the trigger.
- Add one or more Action nodes to define where the content should go.
- Review the summary, save the workflow, and activate it only after the logic is correct.
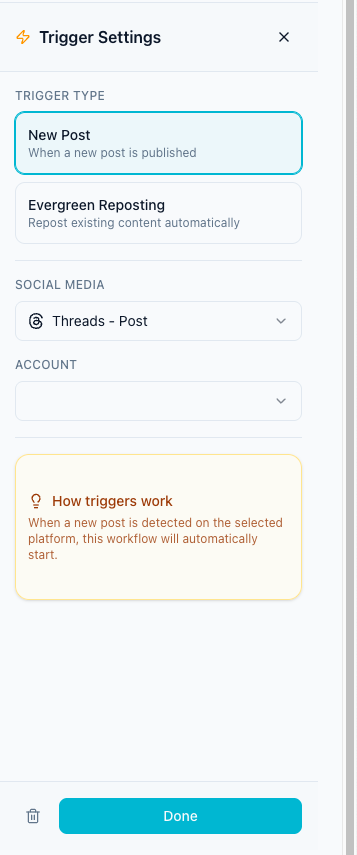
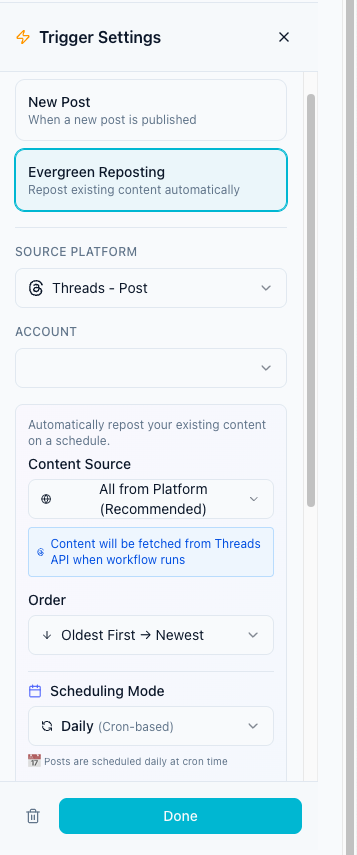
1. Trigger: what starts the workflow
Every workflow starts with a trigger. In the current builder, the two main starting points are:
- New Post: start when Tareno detects fresh content on a source platform
- Evergreen Reposting: start from existing content instead of waiting for a brand-new post
For a new-post workflow, choose the content type first, then select the connected account that should be watched.
Typical trigger setups:
- Instagram Reel -> send it to another short-form channel
- TikTok video -> repurpose it to YouTube Shorts
- LinkedIn post -> turn it into an X post with a custom caption
- Pinterest pin -> reuse it in another publishing flow
2. Delay: add breathing room between steps
Use a delay node when a workflow should wait before the next step runs. This is the simplest way to avoid pushing the same asset to multiple channels at the exact same minute.
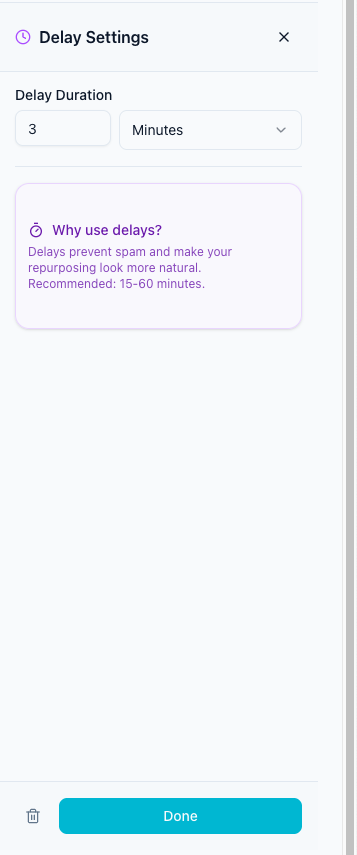
Delay nodes support minutes, hours, and days. A few practical patterns:
- 5 to 15 minutes: lightweight same-day reposting, such as Instagram Post -> Instagram Story
- 30 to 60 minutes: cross-platform repurposing so the content roll-out feels less automated
- 1 day or more: slower campaigns where you want the original post to breathe before reusing it
Use a delay when the content should still be published soon, just not instantly.
3. Schedule: control the publishing cadence
Use a schedule node when you want a workflow to follow a publishing plan instead of firing immediately after the trigger. This is especially useful for evergreen content and queue-based repurposing.
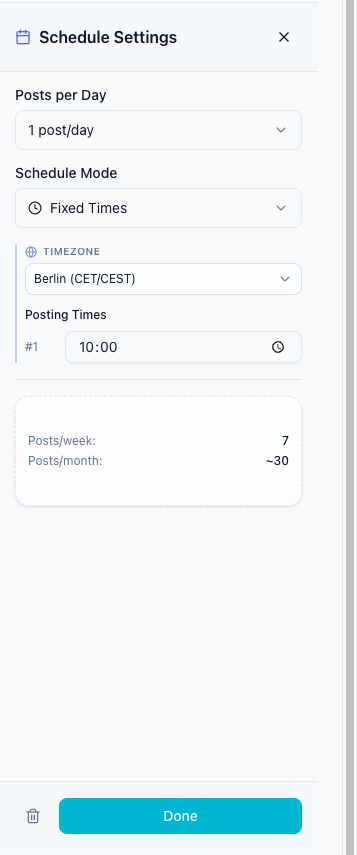
Inside the schedule node you can control:
- Posts per day
- Schedule mode such as fixed times, best time, or evenly spread
- Timezone
- Posting times for fixed schedules
- Minimum hours between posts for best-time scheduling
Use a schedule node when you want Tareno to distribute content over time instead of creating an immediate repost.
4. Action: define the final outcome
The action node decides what actually happens at the end of the workflow. This is where you select the target platform, target account, and caption behavior.
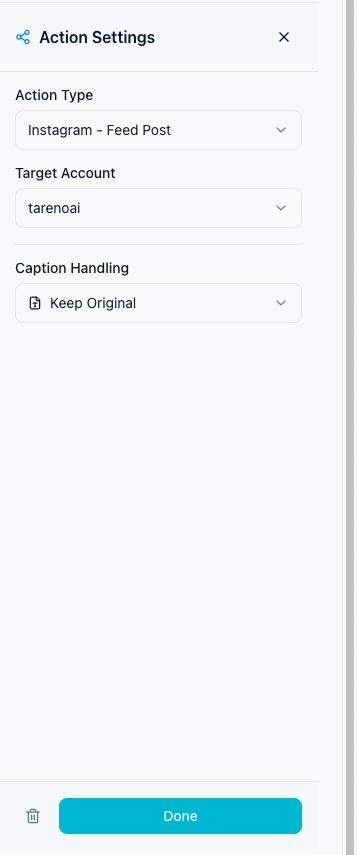
The current action setup supports:
- Destination channels such as TikTok, Instagram, YouTube, Facebook, X, LinkedIn, Pinterest, and Threads
- Connected target accounts per platform
- Caption handling options like Keep Original, Add Prefix/Suffix, AI Rewrite, Custom caption, or Custom per Item
- Platform-specific settings when required, such as TikTok privacy or a Pinterest board
Use multiple action branches when one source post should be distributed to several channels.
When to use Delay vs Schedule
- Use Delay when the next step should happen once after a fixed wait.
- Use Schedule when Tareno should publish content according to a daily cadence or optimized posting window.
- Use both when you want an initial wait and then a controlled publishing plan.
Example workflow 1: TikTok -> YouTube Shorts
This is a strong first workflow because it is simple and maps directly to the built-in template logic.
Setup:
- Add a Trigger node with New Post.
- Select TikTok - Video as the source format.
- Select your TikTok account.
- Add a Delay node and set it to 30 minutes.
- Add an Action node and choose YouTube - Shorts.
- Pick the target YouTube account.
- Keep the original caption or switch to AI Rewrite if you want platform-specific copy.
Why it works:
- TikTok stays the source of truth.
- YouTube Shorts gets the content shortly after the original publish.
- The delay avoids a same-minute duplicate rollout.
Example workflow 2: Instagram Post -> Instagram Story
This is useful when you want feed content to get immediate extra visibility without manual reposting.
Setup:
- Trigger on Instagram - Post.
- Add a Delay of 5 minutes.
- Add an Action for Instagram - Story.
- Use the same Instagram account as the target.
Why it works:
- The feed post goes live first.
- The Story becomes a follow-up reminder instead of competing with the original post.
Example workflow 3: YouTube Short -> multi-platform rollout
The builder supports branching, so one trigger can feed several actions with different delays.
A common setup is:
- Trigger: YouTube - Shorts
- Delay branch 1: 15 minutes -> Action: Post to TikTok
- Delay branch 2: 30 minutes -> Action: Instagram - Reels
- Delay branch 3: 45 minutes -> Action: Facebook - Reels
Why it works:
- You can stagger each destination instead of blasting every platform at once.
- Each branch can use its own caption mode.
- AI rewrite is especially useful when each channel needs slightly different copy.
Example workflow 4: Evergreen repost campaign
Evergreen workflows are built for older content that still deserves distribution.
- Add a Trigger node and choose Evergreen Reposting.
- Pick the source platform and content format.
- Choose whether the source should come from the platform, the repost queue, or local posts.
- Define the content order, for example Oldest First, Shuffle, or Best (Most Engagement).
- Add a Schedule node and define how many posts per day should be published.
- Add one or more Action nodes for the destination channels.
This is the right setup when you want Tareno to keep proven content alive over days or weeks instead of immediately reposting one new asset.
Recommended workflow-building sequence
If you are building from scratch, use this sequence:
- Open Dashboard -> Workflows.
- Create a new workflow or start from a template.
- Configure the trigger completely before adding any follow-up nodes.
- Add delays where you want staggered timing.
- Add a schedule node only if you need controlled daily distribution.
- Add actions for every destination platform.
- Review the summary and check that every action points to the correct target account.
- Save the workflow.
- Activate it only after the logic is complete.
Practical checks before you turn a workflow on
- Make sure the source account and target account are both connected.
- Confirm the action type matches the media format you are sending.
- Keep delays intentional instead of stacking random waits.
- If you use AI captions, remember that each execution uses AI credits.
- For TikTok actions, fill in the required privacy setting so the post does not fail.
Related features and workflows
- Workflow Builder feature overview
- Repurposing Queue for evergreen content management
- Content Repurposing Workflow for full automation setup
- Auto-Repost TikToks to Reels
- Turn YouTube Shorts into TikToks
- API documentation for custom integrations
What to do next
If you want a node-by-node configuration guide, continue with Delays, schedules and actions. If you want to build long-term evergreen rotation, continue with Automated Repost Queue.
Была ли эта статья полезной?
Ваш отзыв помогает нам улучшать документацию.
Последнее обновление